Watch Setup Written Instructions Tutorial
These steps cover the basic steps to crop. For more detailed instructions on setting up a Key, Written Instructions, or Chart, watch the videos above. If you are cropping a chart the app has Intelligent Chart Recognition, please use Cropping Chart.
- Tap Setup. Show Me
- Tap Add. Show Me
- Select Text Piece, Chart Piece, Key, Text Template, or Chart Template. Show Me
- Select the PDF page you want to use and tap Next.
- To orient your piece, use the Rotate and Mirror buttons at the bottom left as needed. If you do not see them next to crop, be sure to toggle crop back on. Show Me
- Crop your piece by dragging diagonally over the part you would like to crop. You can adjust your crop by dragging the crop lines, and make small adjustments by tapping just to either side of the lines.
Show Me
Tap Clear if you want to start your crop again. - When finished cropping, tap the Crop button to see the result. Your new crop shows at the top.
To change your crop, tap the Crop button again. - When ready to start knitting, tap Knit. Show Me
Use cropping to tell knitCompanion where to look on the page for the chart.
- Drag diagonally over the part of the page that contains the chart.
- The crop does not need to be perfect, just ensure all the chart edges are within the crop with a little margin.
- You can crop to exclude extra lines that extend past the edges of the chart to help the system find the true edge of the chart.
- Tap the Wand. Show Me knitCompanion uses artificial intelligence to find the edges of the chart and counts the number of rows and stitches.
- Check your results. Learn more about wand sensitivity.
- Be sure to enter the first row and set count by. If your chart counts 1, 2, 3 then leave count by as 1. If you chart counts 1, 3, 5, then set count by to 2.
- The wand automatically turns grid check on. Zoom in on the chart and ensure the system correctly found the edges of the chart and that the grid overlay matches the actual chart.
- If you have too MANY rows or stitches, slide to Less and tap the Wand again.
- If you have too FEW rows or stitches or if part of the chart is cropped off, slide to More and tap the Wand again.
- If your chart is especially tricky or is a scan that is skewed (not straight on the page), you can manually crop the edges and count your rows and stitches.
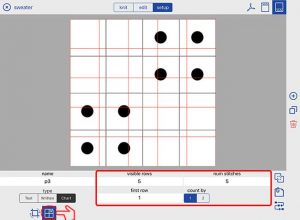
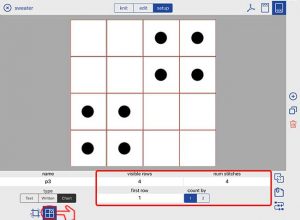
The default grid color is yellow. If you have a hard time seeing it, you can change the Check Grid color in Settings. Show MeBad Grid Check  The grid lines do NOT match the chart.
Good Grid Check  The grid lines match the chart.
Watch Setup Written Instructions Tutorial
- Follow the General Cropping Steps to create your Text Piece.
- Enter the number of visible rows for your piece. Your entry doesn’t have to be exact, you can add or remove rows if needed.
- Starting at the top, adjust the height of the first row.
- Tap the next row and adjust as needed.
- Continue down the piece adjusting as needed.
- If you need to add or remove rows, tap the + or - button. This will add or remove a single row at the bottom, without affecting the rest of your row alignments.
- if your piece counts 1,3,5, be sure to set count by to 2. Note: if your piece shows 1,2,3,5,7… you can include row 1-2 in the first row and set count by to 2. Optionally you can add reminders for the “between” row instructions. See here.
If you have an existing piece you can adjust it. From Setup, select your piece at the top and tap the crop button to use the wand or adjust the crop. Show Me
You may be asked to reset your progress, clear markers, or scribbles in order to adjust your crop. Confirm to proceed.