Play with Color: Recoloring Colorwork Charts
In our previous posts on Magic Markers, we reviewed how to use magic markers to highlight and count stitches. In today’s post, we’ll review how to recolor color work charts to reflect your own personal color choices. With Magic Markers you can:
- Have the colors in your chart match the yarn you are working with so you no longer need to always remember that “red is green and purple is yellow”.
- Play with color combinations in pattern so you can see how they look together before you swatch.
- Get stitch counts for each color so you can clearly see how many are in each run for either the current row or all rows.
Magic Markers make this quick and easy: you pick a sample stitch, magic markers find the rest with one tap. Now you can quickly play around with different options to find the perfect combination.
Create a Chart Piece
Magic Markers are designed to work with any Chart Piece so we will start with a quick refresh of how to setup a Chart Piece. You can do this for any chart. For a refresh on how to setup a chart, see our blog post about it here.
We’ve selected a classic Fair Isle chart to illustrate reworking a color work chart with different colors.

Add a Magic Marker
Tap the edit button, then tap the Magic Marker icon in the right hand menu. Tap the plus (+) to add a Marker.

Choose Magic Marker. Notice that knitCompanion provides detailed instructions for selecting and matching stitches.

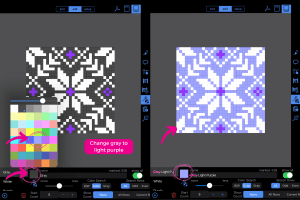
Let’s select the white and turn it gray. Tap on a white stitch to select it. knitCompanion defaults to a naming convention of “mm1” and chooses a random color. Rename the marker to reflect your color (Gray) and tap the color box to select gray.

Notice that the selected box is now gray. To turn all white boxes to gray, change the Color Search button to Color. Then tap the Magic Markers button. Now, all the white boxes are gray.

This method also works if the pattern design has used symbols to indicate colors. Simply tap a box with the symbol and follow the instructions outlined above.
To make the new color more or less transparent, open the color palette and slide the transparency slider (left for lighter, right for darker) before selecting your color choice.

To continue changing colors, press the plus (+) button on the lower left hand side of knitCompanion and choose Magic Marker for each new color change. For this example, we have changed the background to dark gray and the main motif to white. Preview color changes by toggling the “show all” button.
Notice that each new color is listed on the lower left hand side of the screen. You can always access this screen to edit the individual colors by tapping the Magic Marker icon.

With a Magic Marker created for each of your colors, you can now easily swap out colors by selecting any one of your listed Magic Markers and selecting a new color from the color palette. The show all switch lets you toggle between seeing all your chosen colors together and seeing just the color change for the current marker. This way you can play with your color choices to see how they look in your pattern.


You can also Show Counts which will provide stitch counts whenever 3 or more of the same color are together on a row. Show Counts provides the option for All Rows or Current Row. Sometimes with colorwork selecting All Rows is great because you’ll be able to see the counts for the previous (and coming) rows, so if you are suddenly off pattern you will be able to quickly locate and fix the problem. You can also toggle this setting for any marker at any time without loosing your spot in the chart.
