Explore the One-Tap Marker
In our previous post, we set up a chart using Setup + Essentials in the knitCompanion app. We finished having created a chart piece, which automatically generated a One Tap Marker. Now, let’s explore what the One Tap Marker can do for us. In this post, we’ll cover advancing in a pattern, frogging one or several rows, repeating a chart piece, and voice control (Apple only at this time).
Quick Jump Links
Jump down to any topic in this post with the links below:
- Advancing in a Pattern
- Frogging (go back or reset your current row)
- Repeating your Piece
- Voice Commands (Apple only)
Advancing in a Pattern
For illustrative purposes, we will use the same chart piece from our previous post. Note that these instructions apply whether you are working a chart or a written pattern piece (an upcoming post will cover how to add a one-tap for written).
Note the One Tap Marker on the right hand size of the screen. The top number indicates the current row, while the bottom number indicates the total rows worked.

To advance in the pattern, click the One Tap Marker. You’ll notice that the highlighter bar advances alongside the row number inside the One Tap Marker.
Frogging (go back or reset)

To reset a row, long press the One Tap Marker. A window will appear indicating the total number of rows and piece repeats worked. To frog one or more rows, tap the left hand symbol of the circle containing an arrow above a 1. To reset the entire chart piece (frog all rows), tap the right hand symbol of the circle containing the circular arrow. A confirmation window will appear to confirm the reset.


Repeating a Piece
By default, knitCompanion will repeat a chart or text piece once you’ve knit the last row of the chart.
For instance, we told knitCompanion that our chart piece has 20 rows; after row 20, our highlighter bar will revert to row 1, and a new row count will begin, with the bottom number of the One Tap Marker indicating total rows worked.

However, suppose the pattern indicates this chart must be repeated 5 times and we’d like to set a limit on the repeats.
From your chart piece page, tap the setup button at the top of the screen. Make sure the lower menu is also enabled. Tap the bottom most symbol on the right hand side of the screen—this brings us to our Piece Settings.

Enter the number of repeats in the “Piece Repeat Limit” field. Click the back arrow on the top left hand side of the screen to navigate back to the pattern. Click knit at the top of the screen.

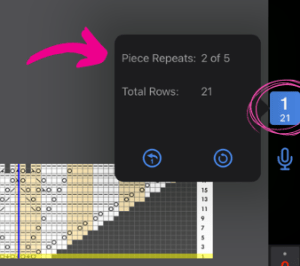
To view the total number of piece repeats, long press the One Tap Marker. As shown above, we are on row 1 of the second round of 5 total piece repeats.

Using Voice Control (Apple only)
To use One Tap Markers hands-free, set up voice commands. Tap the microphone icon on the right hand side of the screen. You may be asked to grant knitCompanion access to the microphone and the voice system. Once you grant these permissions, a confirmation window will appear with Voice Control command information. Click or speak OK to confirm.

A blue microphone indicates Voice Control is off. A red microphone indicates Voice Control is on. Voice Control work best with a pair of mic’d headphones.

Say NEXT to advance a row and BACK to frog a row. If you are zoomed in on a chart piece and need to move left or right to see more of the screen, say RIGHT or LEFT, depending on the direction. CLEAR will clear any shaping steps for the current row (if applicable). OK closes a popup window, and STOP turns off Voice Control.

We hope this guide on One Tap Markers has helped you simplify the knitting process while using knitCompanion. Now that you know what the One Tap Marker can do for you you’ll want to be able to add it to written instructions too. Next time, we’ll dive into the steps to add a one-tap marker for written instructions.
